Hello Dev.
Laravel 8 Sanctum authentication article; on this academic, we will share a way to create or build a secure PHP RESTful API in Laravel 8 application with the help of the Laravel 8 sanctum package. Likewise, we will explain to you one by one how to test the Laravel 8 Sanctum authentication REST API the usage of the Postman testing tool.
Laravel Sanctum(https://laravel.com/docs/8.x/sanctum) gives an immaculate, secure, blazingly fast, lightweight authentication system for single-page applications (SPA), mobile applications, and easy, token-based APIs.
Sanctum is a profound package that allows each user to generate a multiple API tokens for his or her account independently. these tokens supply numerous roles and scopes that explain which actions the tokens are entitled to carry out. So, permit’s start developing the sanctum rest api inside the laravel application without stepping into theories.
Step 1: Create Laravel Project
You have to open the terminal, add the following command to create a Laravel project. But, ensure you have composer installed on your system.
composer create-project --prefer-dist laravel/laravel laravel-sanctum-auth
Step 2: Add Database Details
You have to add the database details into the .env configuration file to communicate between the laravel and mysql database.
.env
DB_CONNECTION=mysql
DB_HOST=127.0.0.1
DB_PORT=3306
DB_DATABASE=db_name
DB_USERNAME=root
DB_PASSWORD=
Step 3: Install Laravel Sanctum Pacakage
Type the composer command on the terminal console and execute it to begin installing the sanctum package into the laravel app.
composer require laravel/sanctum
Step 4: Setting Up Sanctum
Sanctum library has been added to laravel, and now you need to add the sanctum provider. Consequently, publish sanctum configuration with the help of vendor publish.
php artisan vendor:publish --provider="Laravel\Sanctum\SanctumServiceProvider"
Thereafter, register the sanctum middleware into the api array inside the app/Http/Kernel.php file...
Kernel.php
protected $middlewareGroups = [
...
...
    'api' => [
        \Laravel\Sanctum\Http\Middleware\EnsureFrontendRequestsAreStateful::class,
        'throttle:api',
        \Illuminate\Routing\Middleware\SubstituteBindings::class,
    ],
...
...
];
Execute the following command to run migration; similarly later within the database we will generate a sanctum table to handle auth information.
php artisan migrate
Subsequently, we have to make the sanctum configuration ready for the laravel auth project. Consequently, add the sanctum HasApiTokens class into the app/Models/User.php file.
User.php
<?php

namespace App\Models;

use Illuminate\Contracts\Auth\MustVerifyEmail;
use Illuminate\Database\Eloquent\Factories\HasFactory;
use Illuminate\Foundation\Auth\User as Authenticatable;
use Illuminate\Notifications\Notifiable;

// sanctum
use Laravel\Sanctum\HasApiTokens;

class User extends Authenticatable
{
    use HasApiTokens, HasFactory, Notifiable;

    /**
     * The attributes that are mass assignable.
     *
     * @var array
     */
    protected $fillable = [
        'name',
        'email',
        'password',
    ];

    /**
     * The attributes that should be hidden for arrays.
     *
     * @var array
     */
    protected $hidden = [
        'password',
        'remember_token',
    ];

    /**
     * The attributes that should be cast to native types.
     *
     * @var array
     */
    protected $casts = [
        'email_verified_at' => 'datetime',
    ];
}
Step 5: Update Model and Run Migration
Use php artisan command to create a new blog migration table, type command on terminal and execute it to generate a new migration file.
php artisan make:migration create_blogs_table
You have to add few properties into the migration file, so open and add code into the database/migrations/create_blogs_table.php file.
create_blogs_table.php
<?php

use Illuminate\Database\Migrations\Migration;
use Illuminate\Database\Schema\Blueprint;
use Illuminate\Support\Facades\Schema;

class CreateBlogsTable extends Migration
{
    /**
     * Run the migrations.
     *
     * @return void
     */
    public function up()
    {
        Schema::create('blogs', function (Blueprint $table) {
            $table->id();
            $table->string('title');
            $table->text('description');
            $table->timestamps();
        });
    }

    /**
     * Reverse the migrations.
     *
     * @return void
     */
    public function down()
    {
        Schema::dropIfExists('blogs');
    }
}
Next, create an app/Models/Blog.php file and register product migration properties inside the $fillable array.
Blog.php
<?php

namespace App\Models;

use Illuminate\Database\Eloquent\Factories\HasFactory;
use Illuminate\Database\Eloquent\Model;

class Blog extends Model
{
    use HasFactory;
    protected $fillable = [
        'title',
        'description'
    ];
}
Run recommended command to run database migration...
php artisan migrate
Step 6: Build API Resources
We are taking the help of laravel’s eloquent api resources. It allows you to manage a similar response as your model has; for instance, we will use BlogController, which will match the properties of the Blog model.
Execute command to generate Blog eloquent api resources.
php artisan make:resource Blog
Place the suggested code into the app/Http/Resources/Blog.php file...
Blog.php
<?php

namespace App\Http\Resources;
use Illuminate\Http\Resources\Json\JsonResource;

class Blog extends JsonResource
{

    public function toArray($request)
    {
        return [
            'id' => $this->id,
            'title' => $this->title,
            'description' => $this->description,
            'created_at' => $this->created_at->format('m/d/Y'),
            'updated_at' => $this->updated_at->format('m/d/Y'),
        ];
    }

}
Step 7: Set Up Controllers
Next, we need to create three controllers to handle the auth process; first, create an API directory into the Controllers folder; after that, create three files simultaneously within the folder name them AuthController, BaseController and BlogController.
These files will individually handle login, signup and blogs crud operations.
Subsequently, add the code in the app/Http/Controllers/API/BaseController.php file...
BaseController.php
<?php

namespace App\Http\Controllers\API;
use Illuminate\Http\Request;
use App\Http\Controllers\Controller as Controller;

class BaseController extends Controller
{
    /**
     * success response method.
     *
     * @return \Illuminate\Http\Response
     */
    public function sendResponse($result, $message)
    {
        $response = [
            'success' => true,
            'data'    => $result,
            'message' => $message,
        ];

        return response()->json($response, 200);
    }

    /**
     * return error response.
     *
     * @return \Illuminate\Http\Response
     */
    public function sendError($error, $errorMessages = [], $code = 404)
    {
        $response = [
            'success' => false,
            'message' => $error,
        ];

        if(!empty($errorMessages)){
            $response['data'] = $errorMessages;
        }

        return response()->json($response, $code);
    }
}
Open and place all the suggested code into the app/Http/Controllers/API/AuthController.php file, it will amplify the user registration and signin process...
AuthController.php
<?php

namespace App\Http\Controllers\API;

use Illuminate\Http\Request;
use App\Http\Controllers\API\BaseController as BaseController;
use Illuminate\Support\Facades\Auth;
use Validator;
use App\Models\User;

class AuthController extends BaseController
{

    public function signin(Request $request)
    {
        if(Auth::attempt(['email' => $request->email, 'password' => $request->password])){
            $authUser = Auth::user();
            $success['token'] =  $authUser->createToken('MyAuthApp')->plainTextToken;
            $success['name'] =  $authUser->name;

            return $this->sendResponse($success, 'User signed in');
        }
        else{
            return $this->sendError('Unauthorised.', ['error'=>'Unauthorised']);
        }
    }

    public function signup(Request $request)
    {
        $validator = Validator::make($request->all(), [
            'name' => 'required',
            'email' => 'required|email',
            'password' => 'required',
            'confirm_password' => 'required|same:password',
        ]);

        if($validator->fails()){
            return $this->sendError('Error validation', $validator->errors());
        }

        $input = $request->all();
        $input['password'] = bcrypt($input['password']);
        $user = User::create($input);
        $success['token'] =  $user->createToken('MyAuthApp')->plainTextToken;
        $success['name'] =  $user->name;

        return $this->sendResponse($success, 'User created successfully.');
    }

}
Head over to the app/Http/Controllers/API/BlogController.php file and insert the CRUD operations code into it...
BlogController.php
<?php

namespace App\Http\Controllers\API;

use Illuminate\Http\Request;
use App\Http\Controllers\API\BaseController as BaseController;
use Validator;
use App\Models\Blog;
use App\Http\Resources\Blog as BlogResource;

class BlogController extends BaseController
{

    public function index()
    {
        $blogs = Blog::all();
        return $this->sendResponse(BlogResource::collection($blogs), 'Posts fetched.');
    }

    public function store(Request $request)
    {
        $input = $request->all();
        $validator = Validator::make($input, [
            'title' => 'required',
            'description' => 'required'
        ]);
        if($validator->fails()){
            return $this->sendError($validator->errors());
        }
        $blog = Blog::create($input);
        return $this->sendResponse(new BlogResource($blog), 'Post created.');
    }

    public function show($id)
    {
        $blog = Blog::find($id);
        if (is_null($blog)) {
            return $this->sendError('Post does not exist.');
        }
        return $this->sendResponse(new BlogResource($blog), 'Post fetched.');
    }

    public function update(Request $request, Blog $blog)
    {
        $input = $request->all();

        $validator = Validator::make($input, [
            'title' => 'required',
            'description' => 'required'
        ]);

        if($validator->fails()){
            return $this->sendError($validator->errors());
        }

        $blog->title = $input['title'];
        $blog->description = $input['description'];
        $blog->save();

        return $this->sendResponse(new BlogResource($blog), 'Post updated.');
    }

    public function destroy(Blog $blog)
    {
        $blog->delete();
        return $this->sendResponse([], 'Post deleted.');
    }
}
Step 8: Create REST API Routes
You need to use controllers to build sanctum auth api routes; we have defined the login, register post methods and resources to create auth api collectively.
Open and insert code into routes/api.php file...
api.php
<?php

use Illuminate\Http\Request;
use Illuminate\Support\Facades\Route;

use App\Http\Controllers\API\AuthController;
use App\Http\Controllers\API\BlogController;

/*
|--------------------------------------------------------------------------
| API Routes
|--------------------------------------------------------------------------
*/

Route::post('login', [AuthController::class, 'signin']);
Route::post('register', [AuthController::class, 'signup']);

Route::middleware('auth:sanctum')->group( function () {
    Route::resource('blogs', BlogController::class);
});
Step 09: Test REST API in Postman
We have created the REST API using sanctum auth; further you need to start the laravel development server with the help of the php artisan command...
php artisan serve
With the help of Postman, we will test the Laravel Sanctum authentication APIs...
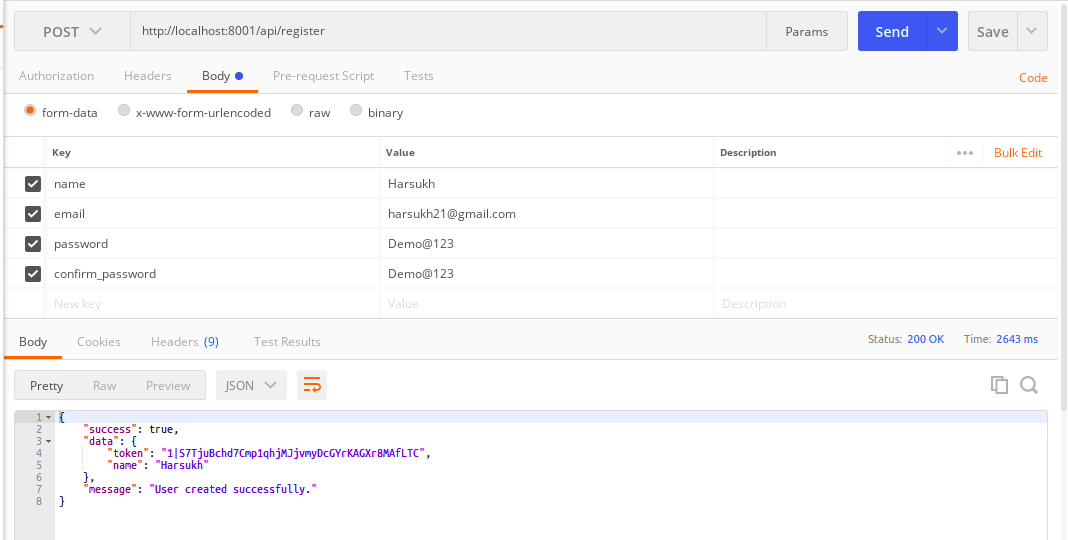
Test Register REST API
Open the Postman app, select the Post method from the dropdown. Enter the route or URL in the address bar, select the Body section, enter name, email, password and confirm the password and click on send to create a user using laravel sanctum auth api.
http://localhost:8000/api/register
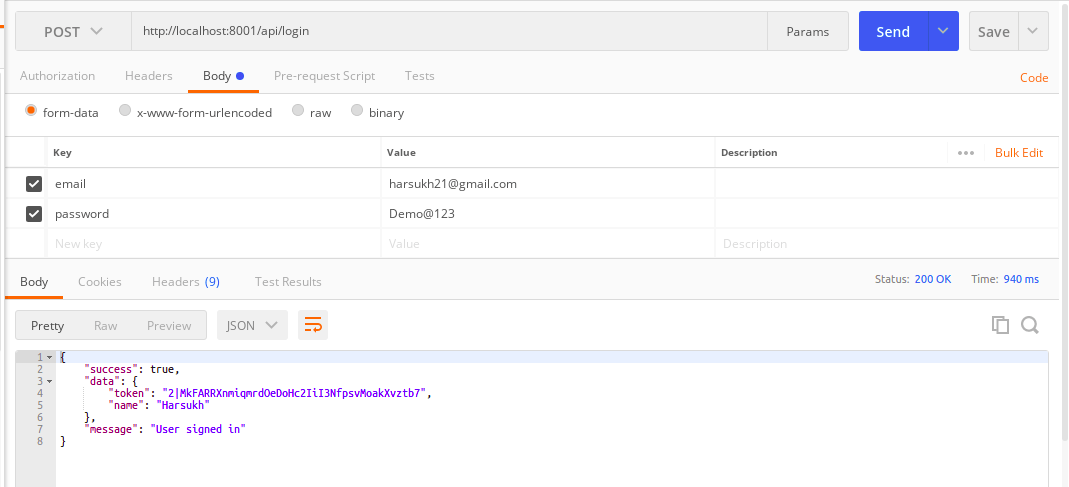
Test Login API
Add the following URL in the postman address bar, switch the method to GET, enter email and password and click on send to login a user.
http://localhost:8000/api/login
Set Authorization Token
Get into the Postman app’s Authorization tab, select ‘Bearer Token’ from the Type dropdown, then add the auth token that you got when logged into the app.
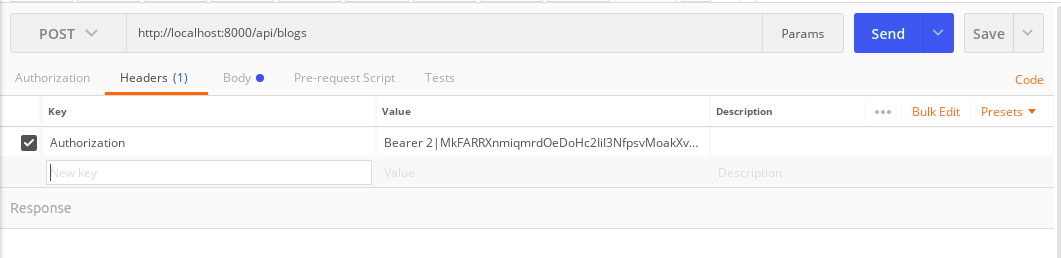
Create Post with Sanctum API
Add the following URL in the postman address bar, switch the method to POST, enter title and description then click to create a post and store into the database.
http://localhost:8000/api/blogs

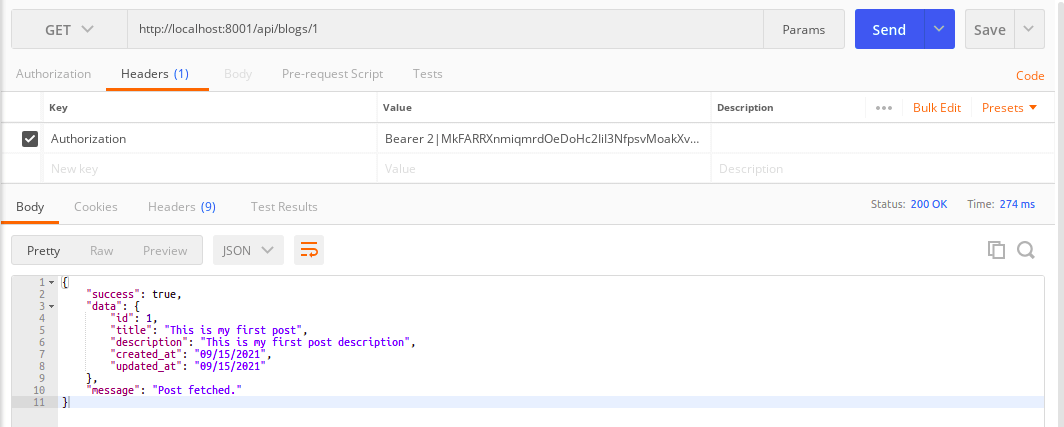
Get Single Post
You can now see how to fetch single post using the post id and rest api, use the given below url...
http://localhost:8000/api/blogs/{id}
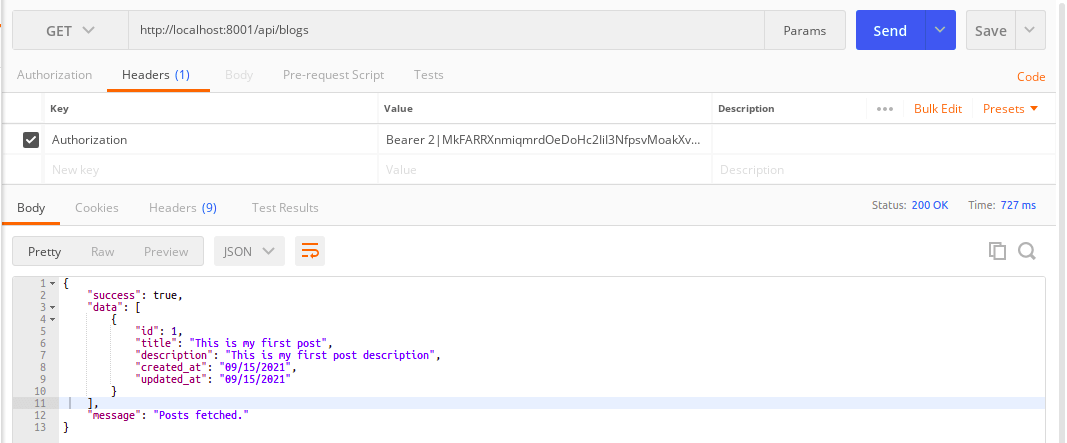
Fetch All Posts
You can fetch all the posts at once, hence use the following REST API with GET method to get all the records.
http://localhost:8000/api/blogs
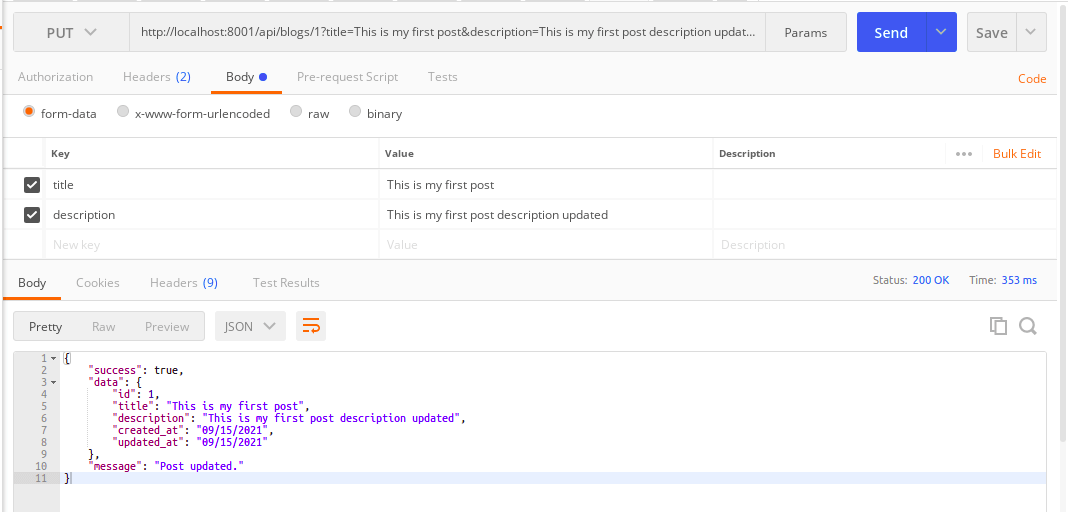
Update Post
Update a post using sanctum auth restful api, add the following route with Put method to update a single record into the database.
http://localhost:8000/api/blogs/{id}
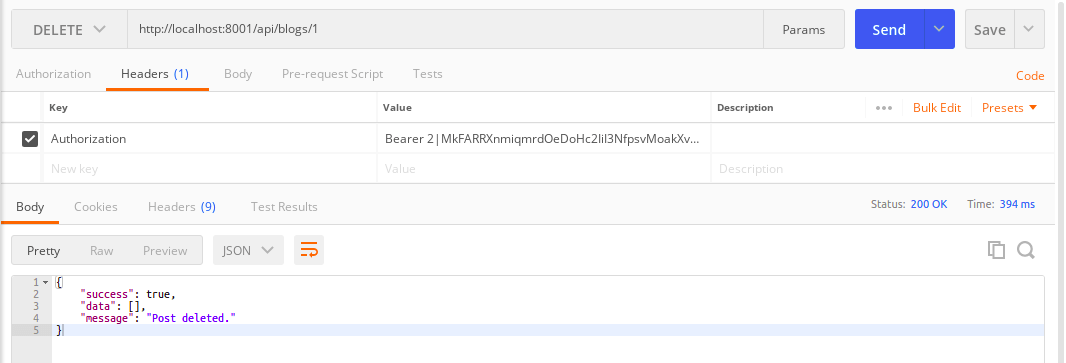
Delete Record
To delete a record set the method to delete and use the following url...
http://localhost:8000/api/blogs/{id}
 i'm hoping it assist you to, thanks for visit my article if you like my article then proportion together with your friend and social platform.