Hello Dev.
Laravel 8 mobile number OTP authentication article; throughout this one by one article, you will find out a way to create phone or mobile number OTP authentication in Laravel 8 using the Firebase phone sign-in auth provider.
Firebase is a profound backend as a provider tool, which makes the improvement work exorbitantly facile. To develop the robust authentication system, it gives heaps of ready-made features that you could implement to your app and extend the development work.
In this article, we are integrating the Firebase phone and mobile OTP authentication in the Laravel app.
To integrate Firebase mobile number OTP auth in Laravel 8 app, you want to setup a simple laravel app, connect it to the database, create a controller and bind it to the route. lastly, create a easy view for sending mobile number otp through the Firebase environment.
Step 1: Install Laravel App
You need to commence the fundamental step by installing a new laravel application using composer command, ensure to configure composer on the system, then execute the following command.
composer create-project --prefer-dist laravel/laravel laravel-phone-otp-auth
Step 2: Create Firebase Project
Visit to Firebase site, then signin using your firebase credentials, thereafter click on Create a project button.

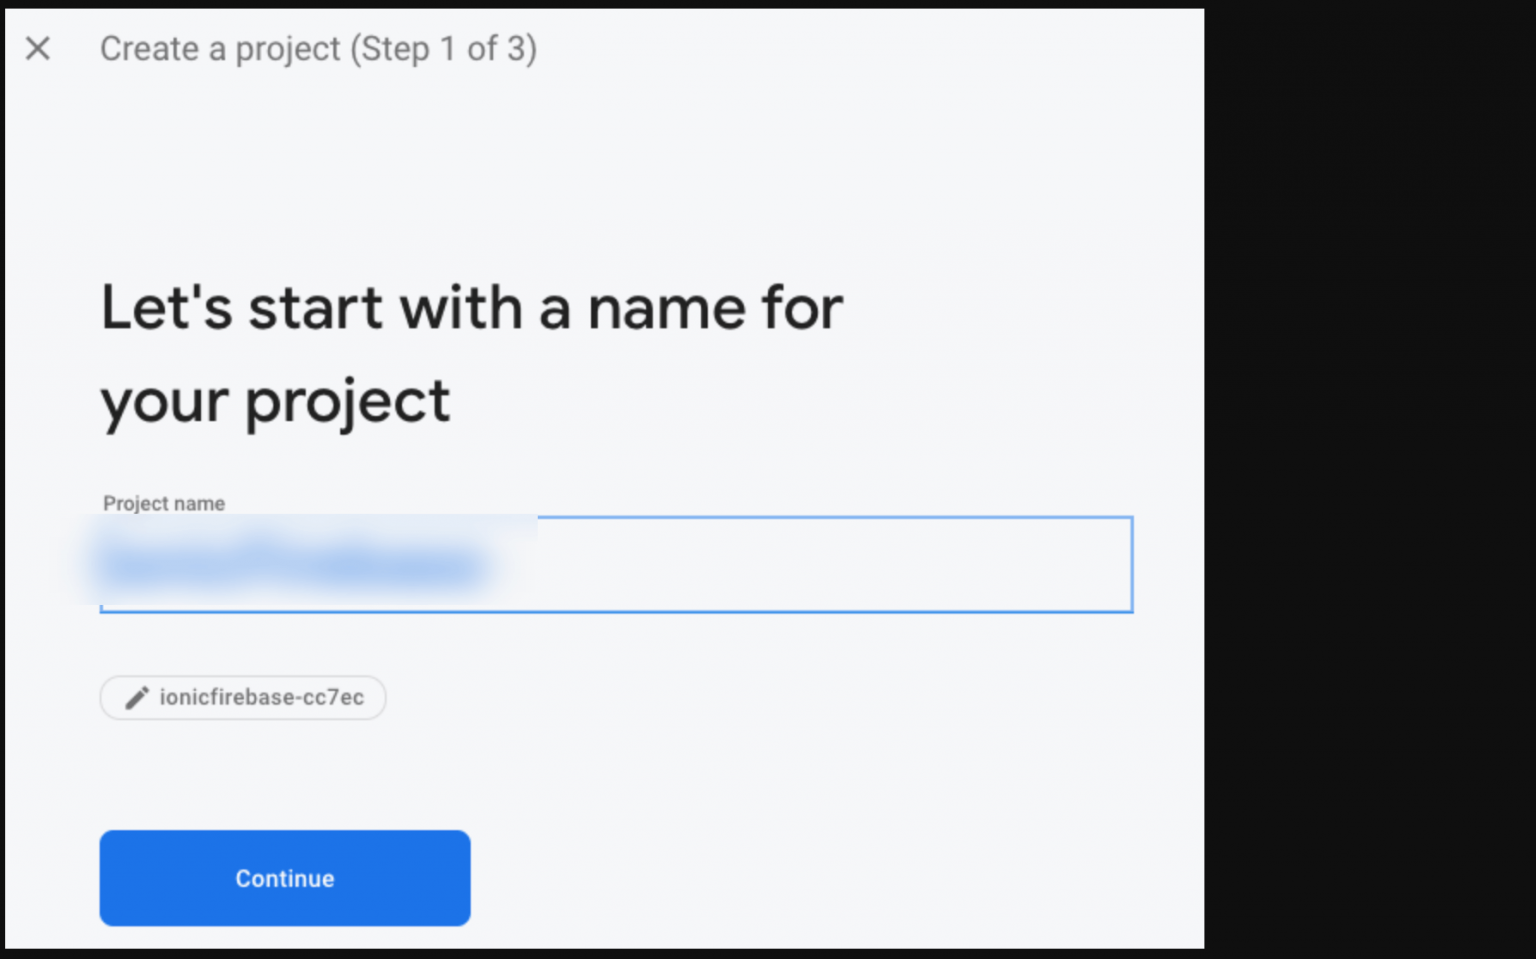
Add project name, and click on continue.
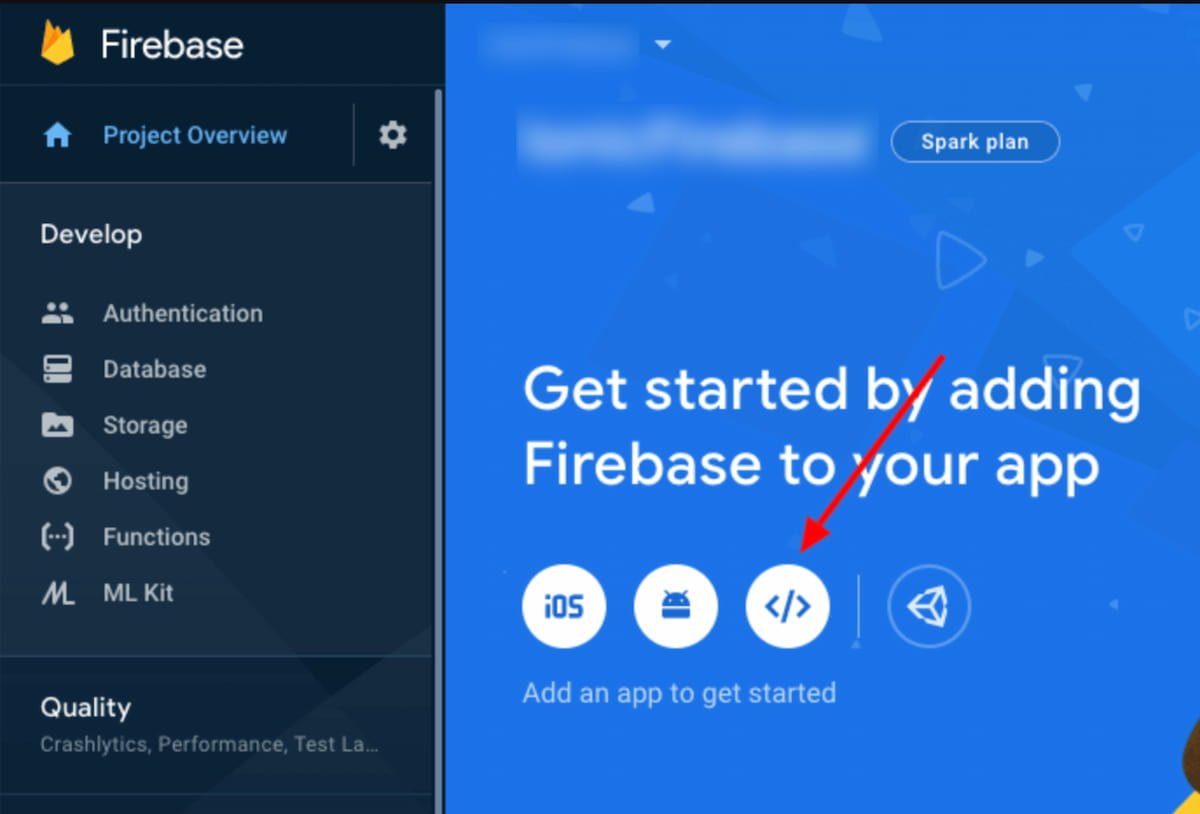
Next, add Firebase to your app, so to get credentials to click on the markup icon.
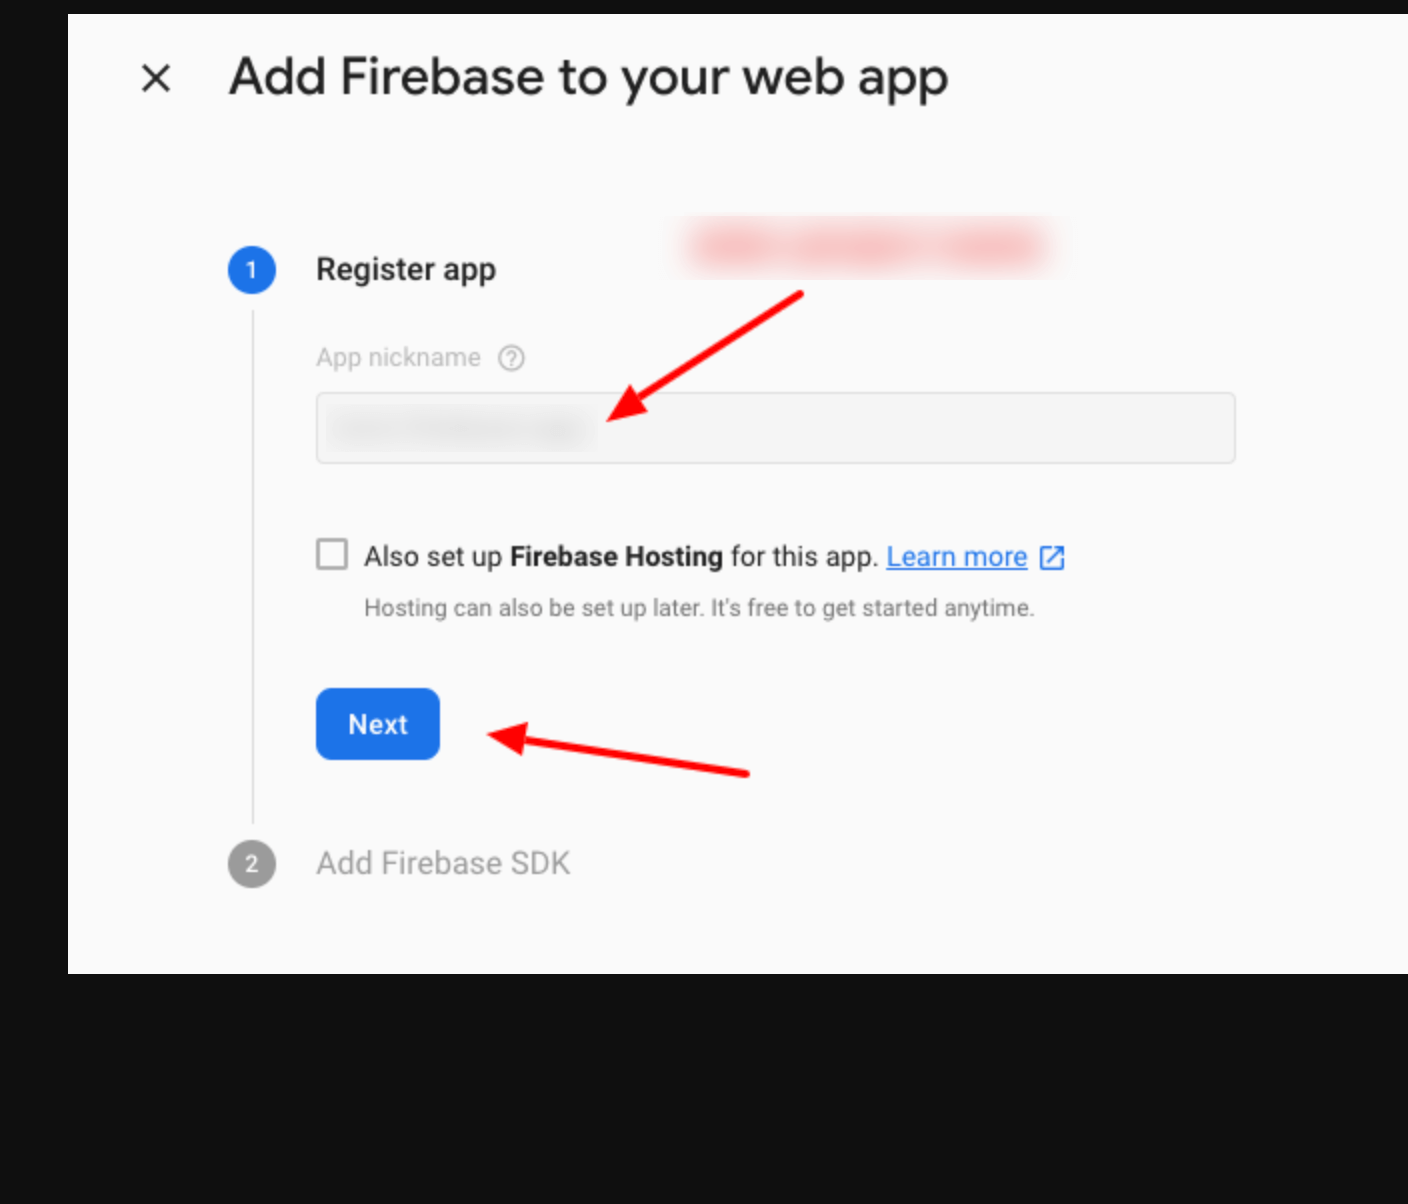
Next, you need to register app and click on Next.
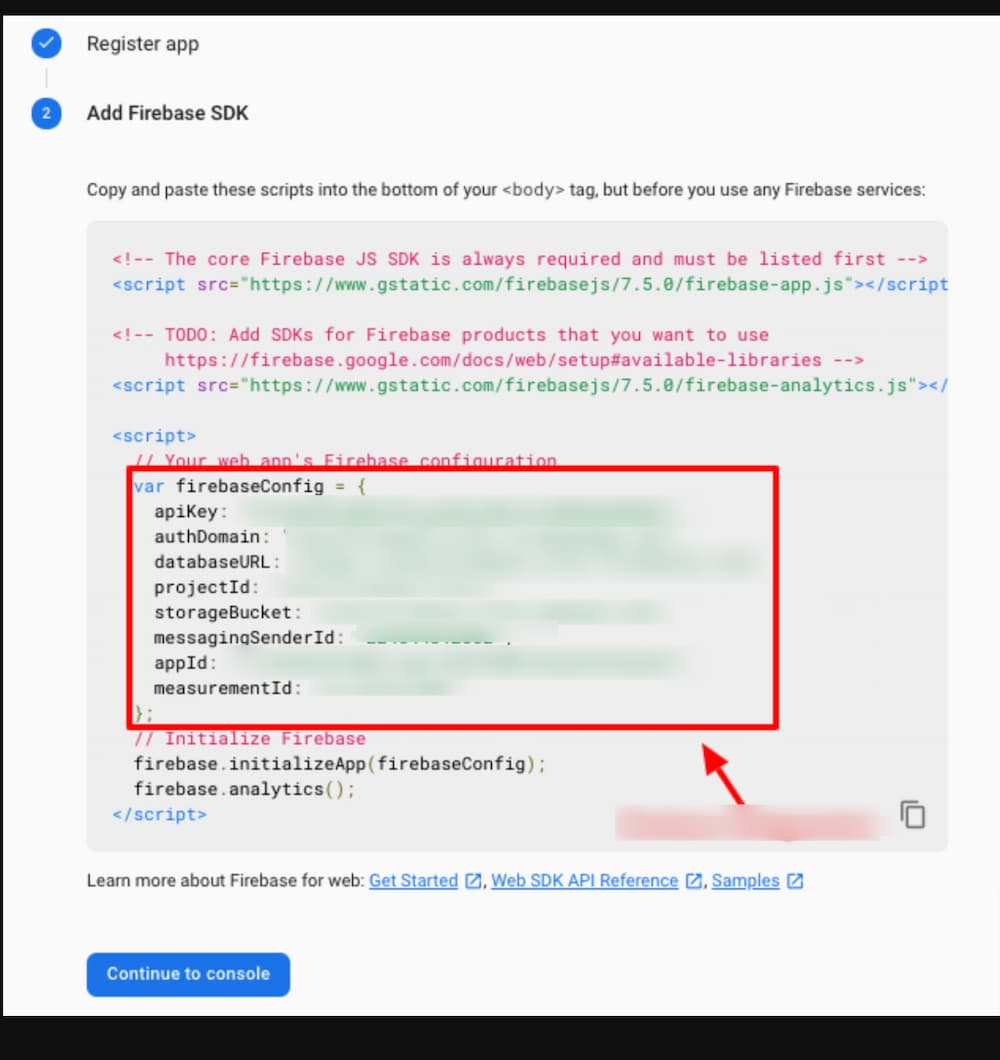
From this page, you need to copy firebase configurations.
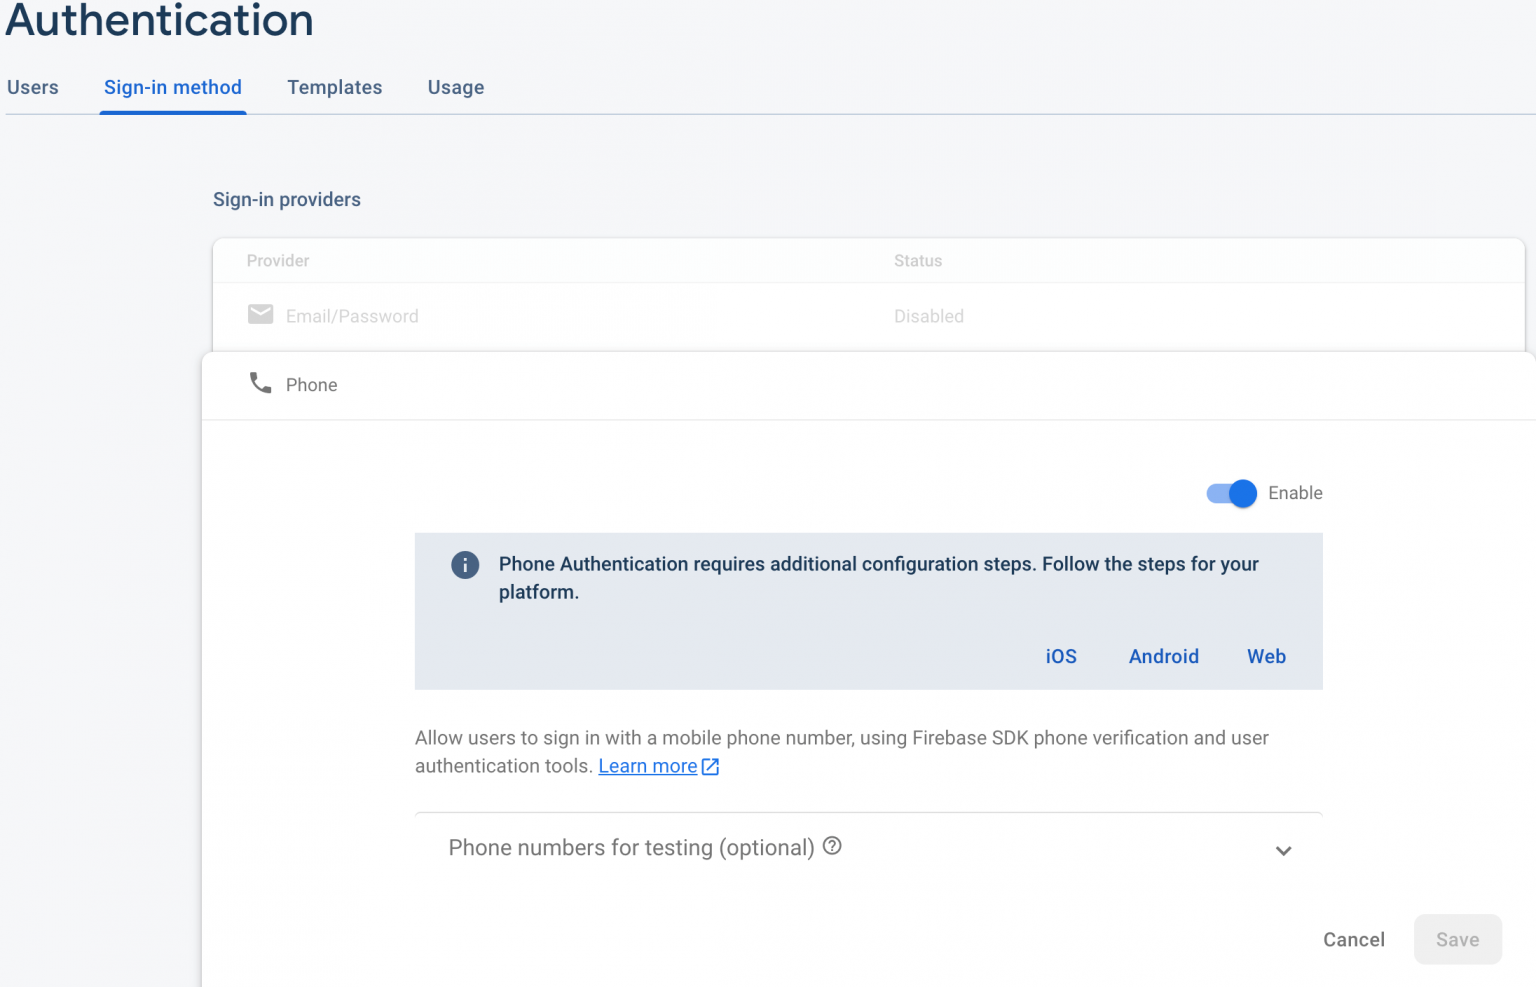
Step 3: Enable Firebase Phone Auth
The Firebase project has been created. Now you have to enable the firebase phone authentication, click on the authentication tab, select the Sign-in method segment, click on the Phone item and enable the Phone auth.
Step 4: Add Database Details
Add database name, user name, and password into the .env file...
.env
DB_CONNECTION=mysql
DB_HOST=localhost
DB_PORT=3306
DB_DATABASE=database_px
DB_USERNAME=root
DB_PASSWORD=
Step 5: Create Controller
Open terminal, type command, then execute the command that generates a new controller; in this controller we will call the blade view for showing the mobile otp auth form.
php artisan make:controller PhoneAuthController
Open and add code in app/http/controllers/PhoneAuthController.php file...
PhoneAuthController.php
<?php

namespace App\Http\Controllers;

use Illuminate\Http\Request;


class PhoneAuthController extends Controller
{

    public function index(){
      return view('welcome');
    }
}
Step 6: Add Route
Open and create a new route by using the PhoneAuthController, add the following code in routes/web.php File...
web.php
<?php

use Illuminate\Support\Facades\Route;
use App\Http\Controllers\PhoneAuthController;

/*
|--------------------------------------------------------------------------
| Web Routes
|--------------------------------------------------------------------------
*/


Route::get('phone-auth', [PhoneAuthController::class, 'index']);
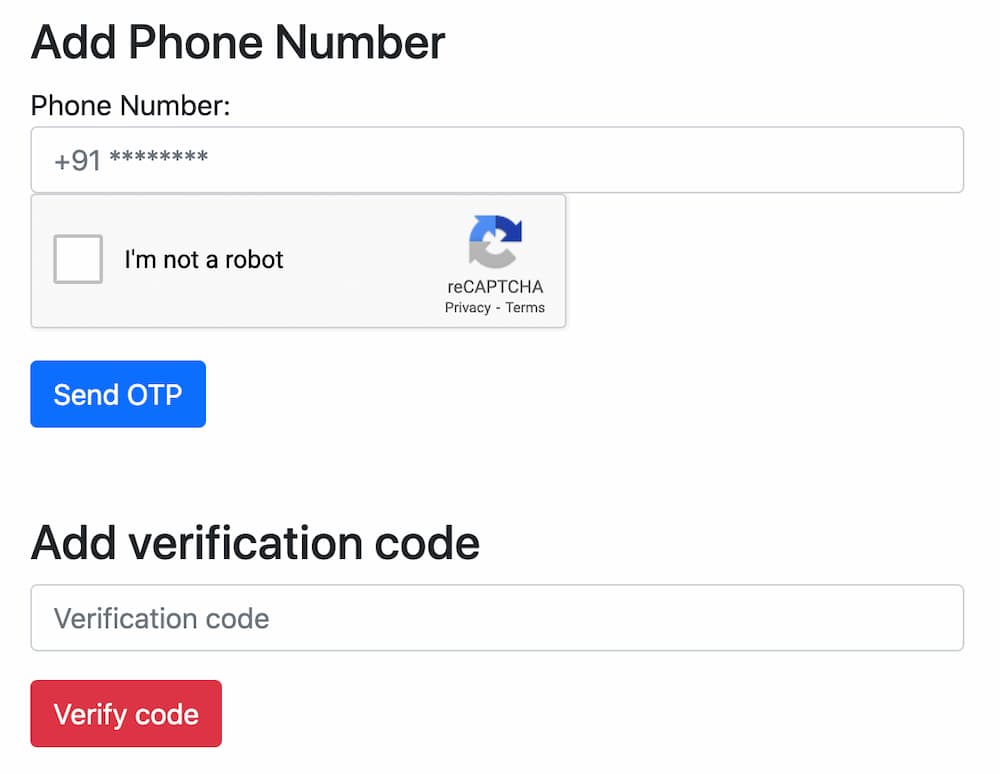
Step 7: Set Up Blade View
We are using the default welcome blade view file to create the auth form’s locus, add bootstrap 5, firebase, and jQuery scripts in this template, add some custom functions that handle the phone auth in firebase.
Open and replace with the following code in resources/views/welcome.blade.php File...
welcome.blade.php
<!DOCTYPE html>
<html lang="{{ str_replace('_', '-', app()->getLocale()) }}">

<head>
    <meta charset="utf-8">
    <meta name="viewport" content="width=device-width, initial-scale=1">
    <title>Laravel 8 Phone Number OTP Authentication - meaningarticles.com</title>
    <link href="https://cdn.jsdelivr.net/npm/[email protected]/dist/css/bootstrap.min.css" rel="stylesheet">
</head>

<body>
    <div class="container mt-5" style="max-width: 550px">

        <div class="alert alert-danger" id="error" style="display: none;"></div>

        <h3>Add Phone Number</h3>

        <div class="alert alert-success" id="successAuth" style="display: none;"></div>

        <form>
            <label>Phone Number:</label>

            <input type="text" id="number" class="form-control" placeholder="+91 ********">

            <div id="recaptcha-container"></div>

            <button type="button" class="btn btn-primary mt-3" onclick="sendOTP();">Send OTP</button>
        </form>


        <div class="mb-5 mt-5">
            <h3>Add verification code</h3>

            <div class="alert alert-success" id="successOtpAuth" style="display: none;"></div>

            <form>
                <input type="text" id="verification" class="form-control" placeholder="Verification code">
                <button type="button" class="btn btn-danger mt-3" onclick="verify()">Verify code</button>
            </form>
        </div>
    </div>

    <script src="https://cdnjs.cloudflare.com/ajax/libs/jquery/3.6.0/jquery.min.js"></script>
    <!-- Firebase App (the core Firebase SDK) is always required and must be listed first -->
    <script src="https://www.gstatic.com/firebasejs/6.0.2/firebase.js"></script>


    <script>
        var firebaseConfig = {
            apiKey: "API_KEY",
            authDomain: "PROJECT_ID.firebaseapp.com",
            databaseURL: "https://PROJECT_ID.firebaseio.com",
            projectId: "PROJECT_ID",
            storageBucket: "PROJECT_ID.appspot.com",
            messagingSenderId: "SENDER_ID",
            appId: "APP_ID"
        };
        firebase.initializeApp(firebaseConfig);
    </script>
    <script type="text/javascript">
        window.onload = function () {
            render();
        };

        function render() {
            window.recaptchaVerifier = new firebase.auth.RecaptchaVerifier('recaptcha-container');
            recaptchaVerifier.render();
        }

        function sendOTP() {
            var number = $("#number").val();
            firebase.auth().signInWithPhoneNumber(number, window.recaptchaVerifier).then(function (confirmationResult) {
                window.confirmationResult = confirmationResult;
                coderesult = confirmationResult;
                console.log(coderesult);
                $("#successAuth").text("Message sent");
                $("#successAuth").show();
            }).catch(function (error) {
                $("#error").text(error.message);
                $("#error").show();
            });
        }

        function verify() {
            var code = $("#verification").val();
            coderesult.confirm(code).then(function (result) {
                var user = result.user;
                console.log(user);
                $("#successOtpAuth").text("Auth is successful");
                $("#successOtpAuth").show();
            }).catch(function (error) {
                $("#error").text(error.message);
                $("#error").show();
            });
        }
    </script>
</body>

</html>
Step 8: Start Development Server
You may quickly test the application; just type the suggested command on the terminal, execute it start the development server.
php artisan serve
Use the following url to send the otp to authenticate using the phone number via firebase.
http://127.0.0.1:8000/phone-auth
i'm hoping it assist you to, thanks for visit my article if you like my article then proportion together with your friend and social platform.
-function-Example.jpg.jpg)